
Cumulus Linux Data Centre Fabrics
Configuring Interface-Level OSPF on Cisco and Cumulus Linux
Building a lab is one thing; making two different networking "philosophies" talk to each other is another game entirely
Building a lab is one thing; making two different networking “philosophies” talk to each other is another game entirely. In this guide, we are diving deep into interface-level OSPF with Cumulus and Cisco to bridge the gap between Cisco IOSv and Cumulus VX (running FRR).
The goal was simple: build a stable multi-area OSPF network. However, as any engineer will tell you, the “simple” stuff is where the “monsters” hide. From MTU mismatches that freeze adjacencies to the quirks of Linux-based control planes, here is what I learned from my topology and how you can replicate it in your own environment.
Lab Files: If you want to follow along or test these configurations yourself, you can download my GNS3 Project file below
Project 1: The Cisco ABR Setup
In this first scenario, I wanted to see how a Cisco router handles being the bridge. We have R1 sitting in the middle as our Area Border Router (ABR). It connects Area 0 (our Cumulus backbone) and Area 10 (a Cisco internal network).
My Project 1 Topology
| Device | Interface | IP Address | OSPF Area | Role |
|---|---|---|---|---|
| R1 (Cisco) | Gi0/0 (to R2) | 10.0.0.1/30 | 0 | ABR |
| R1 (Cisco) | Gi0/1 (to R3) | 192.168.10.1/24 | 10 | ABR |
| R2 (Cumulus) | swp1 (to R1) | 10.0.0.2/30 | 0 | Backbone |
| R3 (Cisco) | Gi0/0 (to R1) | 192.168.10.2/24 | 10 | Internal |
When I’m at the Cisco console, I always start with a “Secure by Default” mindset. You see, by default, Cisco IOS is quite “chatty.” As soon as you define a network under the OSPF process, the router starts shouting OSPF Hellos out of every matching interface. It’s actively hunting for neighbors, even on ports facing your users or the open internet. OSPF is great, but you don’t want it shouting Hellos out of every port like a town crier.
This is where the concept of the Passive Interface comes in. Instead of leaving every door open, I used passive-interface default to mute everything across the board. Then, I manually “unmute” or explicitly permit OSPF traffic only on the specific links that actually connect to my trusted routers.
! R1 Configuration
interface GigabitEthernet0/0
 ip address 10.0.0.1 255.255.255.252
 ip ospf network point-to-point
 ip ospf 1 area 0
!
router ospf 1
 router-id 1.1.1.1
 passive-interface default
 no passive-interface GigabitEthernet0/0
 no passive-interface GigabitEthernet0/1
Consequently, I also set the network type to point-to-point. Cisco Ethernet defaults to Broadcast, which triggers a DR/BDR election. On a direct link, that’s just unnecessary overhead.
Bringing in the Cumulus Backbone (R2)
Moving over to R2, we are dealing with a Linux-based NOS. Now, this blog isn’t a deep dive into setting up Cumulus from scratch (if you need that, check out my other post, where I discussed the Initial Cumulus Setup & Basics), but we do need to handle the control plane correctly. For my colleagues who haven’t touched Linux networking, the biggest hurdle is understanding that the routing engine operates differently from a traditional appliance.
Unlike Cisco, where the OSPF process is essentially waiting for a command to start shouting, Cumulus requires a bit of setup to wake up the routing daemons. On a Cisco box,**'router ospf 1** 'starts the process immediately. On Cumulus, you have two main ways to wake up the OSPF daemon. If you’re looking for the modern, declarative approach, you can simply run 'nv set vrf default router ospf enable on. However, for this specific lab, I opted for the manual method. If vtysh’ feels empty, run sudo nano /etc/frr/daemons, change ospfd=no to ospfd=yes, and then run sudo systemctl restart frr. Both get you to the same destination, but knowing how to edit the daemon file is a lifesaver when you’re troubleshooting the Linux subsystem.
In addition to the daemon check, I like using NVUE for the foundation IP address and MTU setup, then vtysh for the routing logic.
# NVUE Foundation
nv set interface swp1 ip address 10.0.0.2/30
nv set interface swp1 link mtu 1500
nv config apply
One thing I didn’t mention in my previous setup guide is the concept of auto-saving. On Cisco, we are used to 'copy run start or wr. In Cumulus, every time you nv config apply, it changes the running state, but it doesn’t necessarily commit it to memory for the next reboot unless you hit nv config save. If you want to live life on the fast lane as I did in this lab, run this: nv set system config auto-save enable on. This allows your nv config apply to effectively write to memory at the same time. No more losing your lab progress after a power outage!
Now, for those of you who strictly speak Cisco, you’ll find vtysh' very comfortable. This is because FRRouting (FRR), the engine behind Cumulus routing, was modelled almost exactly after Cisco IOS. The commands, the sub-modes, and the output feel like home.
# FRR Control Plane (vtysh)
vtysh
conf t
 interface swp1
  ip ospf area 0
  ip ospf network point-to-point
 router ospf
  ospf router-id 2.2.2.2
 end
write memory
If you noticed, we did not do the passive-interface default blah-blah-blah on the Cumulus switch! On a Cisco box, if you don’t set a port to passive, it automatically starts broadcasting Hellos. It’s “noisy” by design. But Cumulus operates on Selective Enablement. OSPF won’t send a single packet out of an interface unless you explicitly tell that interface to participate in an area. It’s silent by default, so we don’t need to mute the rest of the switch.
In this project, R1 and R2 initially got stuck in EXSTART. Cumulus virtual interfaces love to default to an MTU of 9216, while Cisco is 1500. Don’t use ip ospf mtu-ignore as a temporary fix; instead, fix it natively on the Cumulus side by adjusting the MTU, or you can adjust the MTU on the Cisco switch, depending on your setup, as I did in the NVUE block above.
Verification: Proof of Life for Project 1
After fixing the MTU and unmuting the interfaces, the moment of truth arrives. We need to see that the adjacency move to FULL. First, I check my neighbors on the Cisco ABR:
# Check OSPF neighbors on Cisco
show ip ospf neighbor
R1 (Cisco) OSPF Neighbor Output showing Full adjacency with R2
Next, I hop into the Cumulus shell to verify the other side of the link:
# Check OSPF neighbors in vtysh
show ip ospf neighbor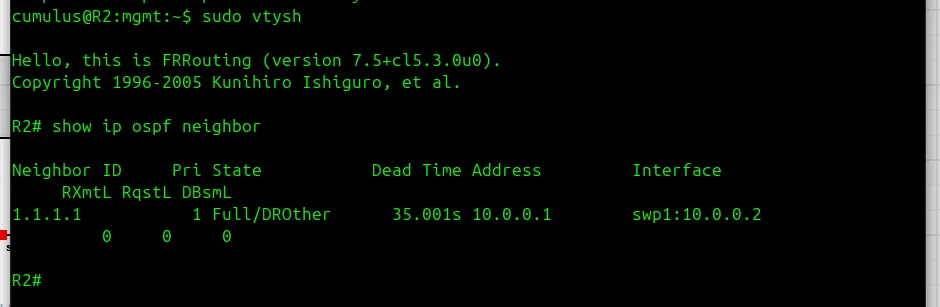
R2 (Cumulus) vtysh OSPF Neighbor Output showing Full adjacency with R1
To really test if the ABR is doing its job, I check the routing table on R3 (Cisco) in Area 10. It should see the backbone network (Area 0) as an inter-area route (O IA).
# Check for Inter-Area routes on the internal router
show ip route ospf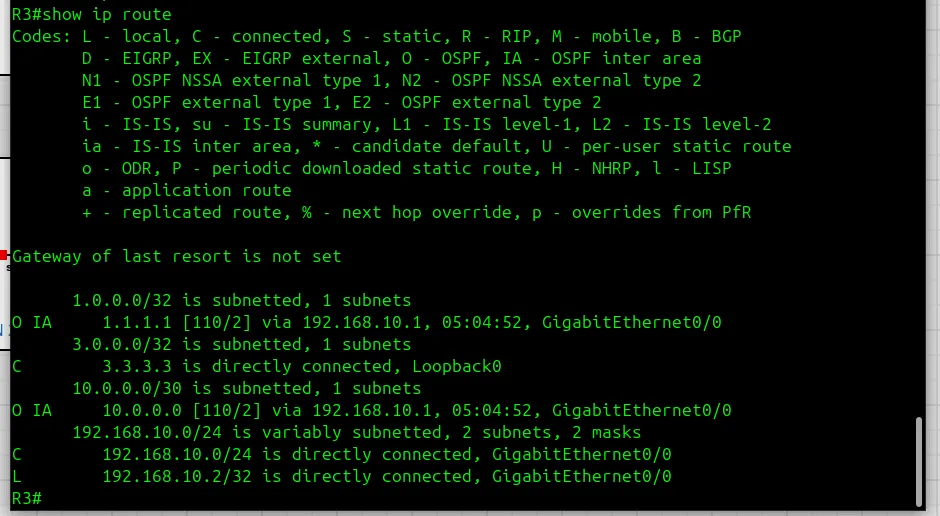
R3 (Cisco) Routing Table showing Inter-Area OSPF routes from Area 0
Project 2: Linear Multi-Area Backbone (Cumulus as ABR)
Once Project 1 was stable, I wanted to flip the script. In this scenario, the Cumulus node (R5) takes the lead as the ABR, linking a Cisco Backbone (R4) to a new Cisco Internal area (R6).
My Project 2 Topology
| Device | Interface | IP Address | OSPF Area | Role |
|---|---|---|---|---|
| R4 (Cisco) | Gi0/0 (to R5) | 10.0.0.1/30 | 0 | Backbone |
| R5 (Cumulus) | swp1 (to R4) | 10.0.0.2/30 | 0 | ABR |
| R5 (Cumulus) | swp2 (to R6) | 172.16.20.1/30 | 20 | ABR |
| R6 (Cisco) | Gi0/0 (to R5) | 172.16.20.2/30 | 20 | Internal |
Since we learned about MTU and Network Types in Project 1, we applied those fixes immediately here. Notice how R5 now manages two different areas on two different interfaces.
# R5 (Cumulus ABR) vtysh
conf t
 interface swp1
  ip ospf area 0
  ip ospf network point-to-point
 exit
 interface swp2
  ip ospf area 20
  ip ospf network point-to-point
 router ospf
  ospf router-id 2.2.2.2
 end
write memory
Verification: The Multi-Area Proof
With R5 acting as the ABR, the real test is whether R4 (Area 0) can talk to R6 (Area 20). First, let’s verify the two-way adjacency on our Cumulus ABR:
# Verify both neighbors on the Cumulus ABR
show ip ospf neighbor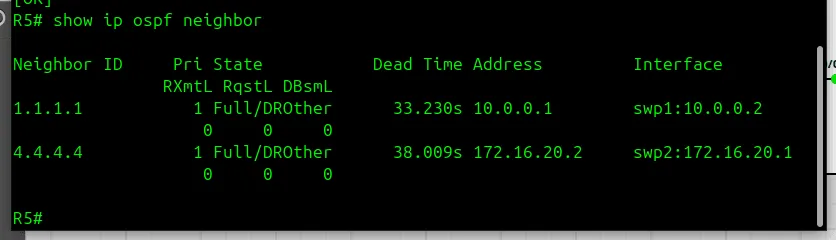
Cumulus ABR vtysh Output showing adjacencies in Area 0 and Area 20
Finally, the end-to-end test. A ping from R4 (Backbone) to R6’s interface (Area 20) across the areas confirms that the Cumulus ABR is correctly generating Summary LSAs and the routing is cohesive.
# End-to-end connectivity test across areas
ping 172.16.20.2
Cisco R4 Console showing a successful 5/5 ping to R6 in Area 20
The Command Rosetta Stone
Verification is everything. Use this table to test your progress as you build:
| Goal | Cisco IOS Command (FRR vtysh) | Cumulus NVUE Command |
|---|---|---|
| Check Neighbors | show ip ospf neighbor | nv show router ospf neighbor |
| Check Interfaces | show ip ospf interface brief | nv show router ospf interface |
| Check Routing Table | show ip route ospf | nv show router route |
| Check LSDB | show ip ospf database | nv show router ospf database |
Closing Thoughts
You may be looking at this lab and wondering where it fits in the real world. While simplified due to simulation resources, this topology mirrors very common enterprise transitions. Imagine an organisation has just acquired another company. One side is running a Linux-based Cumulus data centre fabric, while the other is uses Cisco core.
There are several other real-world reasons why you would see this mix. A company may be doing a Phased Migration , swapping the core switches to Cumulus for high-speed 100G/400G performance but keeping Cisco at the branch offices because they still work perfectly fine. Another huge one is Cloud-on-Prem Integration using Nutanix or OpenStack, which loves Linux-native networking for automation. While traditional ISPs don’t tend to use Cumulus for their core routing, they might use it in their Management Networks or Internal Services Pods to manage the internal servers that keep the lights on.
Multi-vendor labs teach you that protocols don’t care about the logo on the box; they care about the RFCs. Effectively mastering interface-level OSPF with Cumulus and Cisco allows you to bridge these technological gaps with confidence. If things seem quiet in your lab, don’t panic. Run a tcpdump -i swp1 proto ospf -n on the Cumulus side. If you see Multicast arriving but no response, it’s almost always that the daemon is off or you have an MTU mismatch.
Happy Labbing.