
To make this lesson easier to follow, I’ve included the Packet Tracer file for download. Use it to relate to everything discussed so far.
In the last article, we set up OSPF in our network. Now, we’ll test our configuration by sending ICMP packets across the network to confirm if routing works properly. We’ll also explore commands useful for troubleshooting OSPF.
Troubleshoot OSPF Packet Tracer: Testing Route Reachability
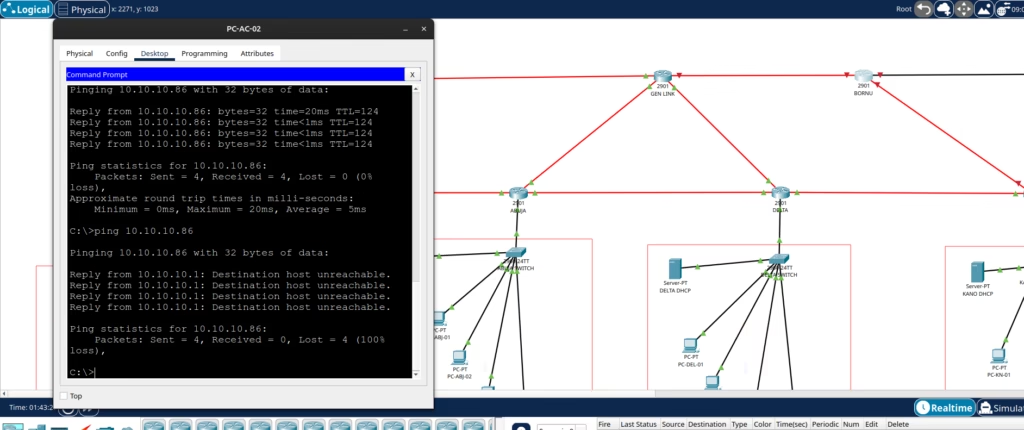
Simple Ping Tests
Each LAN has a DHCP server for IP provisioning, and I renamed the PCs for clarity.
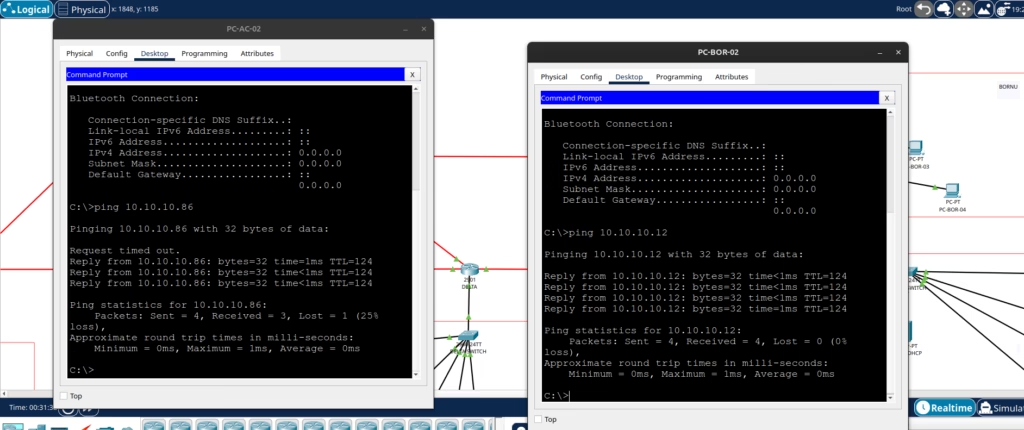
Start by using one of the Accounts PCs to ping a PC in Bornu. You can choose any pair from different LANs.
Successful pings confirm that routers have learned routes to each other. Use simulation mode in Packet Tracer to visualize how packets flow through the network.
Verifying OSPF Configuration and Status
Start with the following command to check which routing protocols are active:
LR#show ip protocols
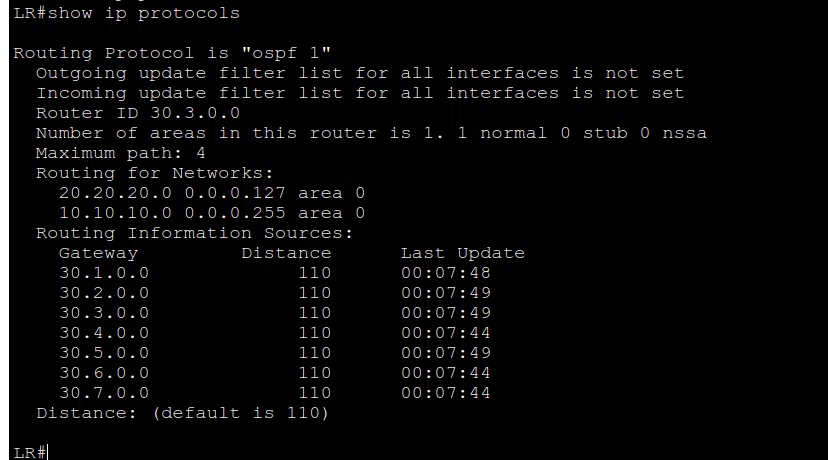
This output confirms:
- OSPF is running
- The router ID (from the loopback interface)
- Networks being advertised
- Known gateways
This command also shows if other routing protocols are enabled or if multiple protocols are in use.
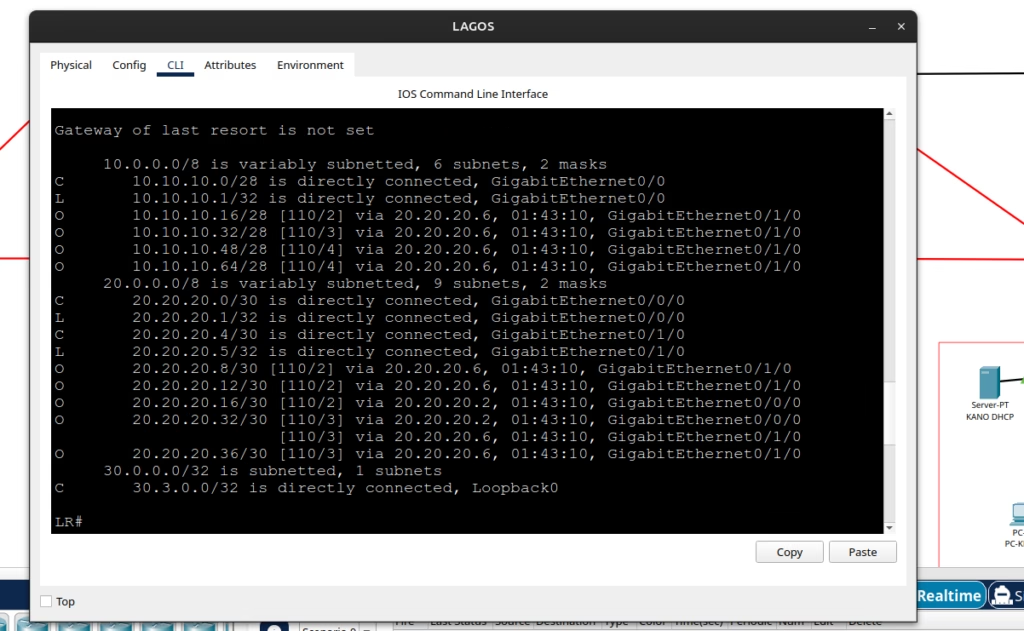
Troubleshooting Routing Table and Learned Routes
The next command you’ll often use for general routing troubleshooting is show ip route. After confirming that OSPF is running on the router, this command helps verify if the router has learned the expected routes.
LR#show ip route
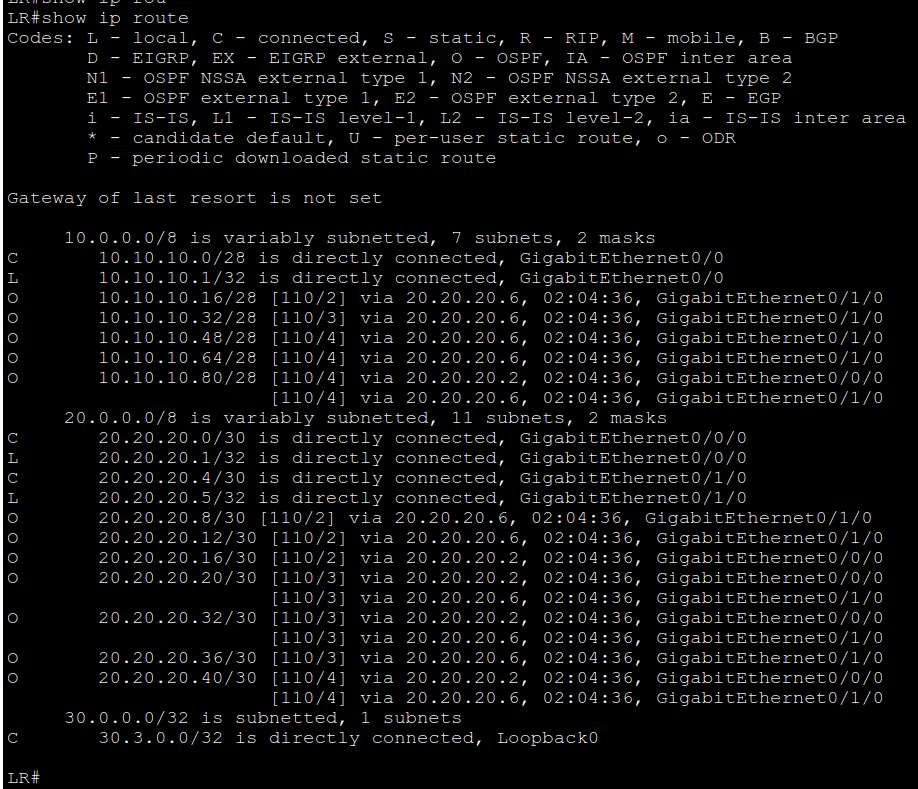
This output displays:
- Directly connected networks (marked with “C”)
- OSPF-learned routes (marked with “O”)
- Next-hop details for remote networks
If a router is unreachable, this command helps confirm if the route exists and is valid.
Try this: shut down the router connecting to Bornu. Then check if the Lagos Router (LR) still has routes to Bornu’s networks.
After turning off Bornu’s router, LR’s routing table no longer lists:
- 10.10.10.80
- 20.20.20.20
- 10.10.10.40
If you can’t reach a PC in Bornu’s LAN, check LR’s routing table. If the route is missing, you’ve found your issue.
Inspecting OSPF Interfaces for Troubleshooting
Use the command below to check which interfaces are participating in OSPF
DR#show ip ospf interface brief

This output helps you:
- Identify which interfaces are part of OSPF
- See assigned IP addresses and subnets
- Confirm the process ID (important in multi-process setups)
- Check which OSPF Area each interface belongs to
This command is especially useful for spotting misconfigured or inactive interfaces. In future lessons, we’ll break the network into multiple areas.
Verifying OSPF Neighbour Relationship in Packet Tracer
To confirm that OSPF neighbor relationships are forming correctly, use:
DR#show ip ospf neighbor
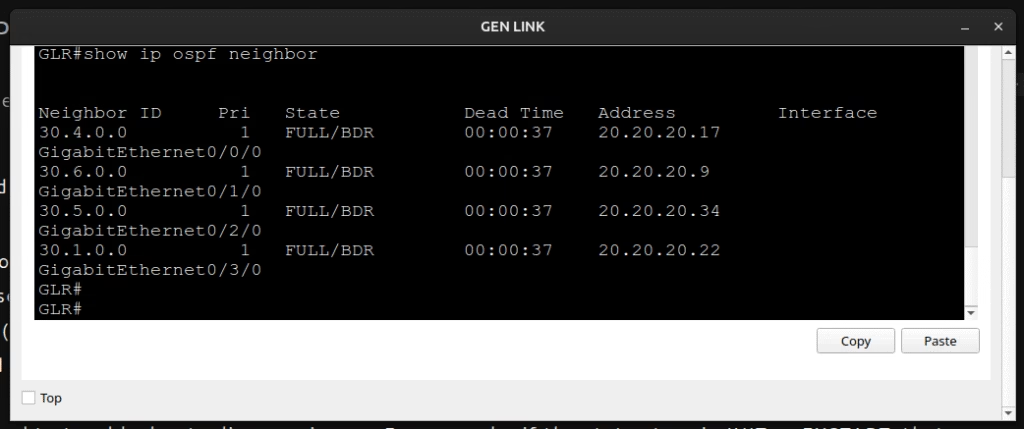
This command displays:
- Neighbor Router IDs
- Interface used to form the adjacency
- OSPF state (e.g., FULL, 2WAY, INIT)
- Priority and dead time
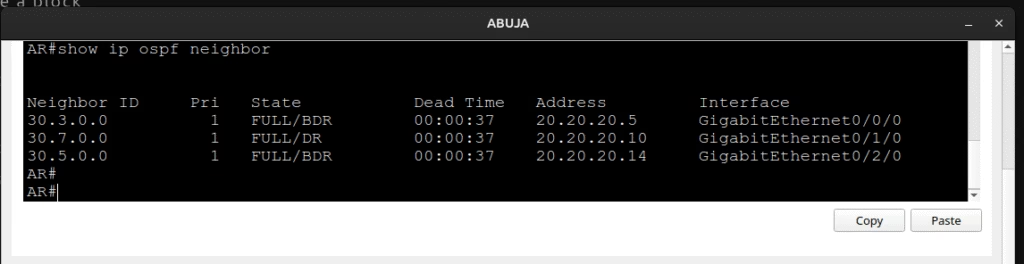
From the image above, each neighbor has reached a FULL state, indicating a successful adjacency. The DR/BDR roles are also visible, showing which router is responsible for managing LSAs in that segment.
Use this command to troubleshoot adjacency issues. For example, if the state stays in INIT or EXSTART, that indicates a problem. It could be mismatched hello/dead timers, different areas, or interface-level misconfigurations.
If you expect a neighbor to be present but it doesn’t show up here, double-check:
- IP connectivity between routers
- OSPF enabled on both interfaces
- Matching OSPF Area IDs
This is your go-to command when OSPF routers are not forming adjacencies as expected.
Examining the OSPF Database and LSAs
To view the internal OSPF database and the LSAs your router has received, use:
Pair this with show ip ospf neighbor and show ip ospf interface for a complete picture of your OSPF topology.
This command displays all LSAs known to the router, including:
- Router LSAs (Type 1) – describing each router and its directly connected networks.
- Network LSAs (Type 2) – generated by DRs to show networks and attached routers.
- Summary LSAs (Type 3) – summarize inter-area routes.
- AS External LSAs (Type 5) – advertise routes redistributed from other protocols.
When you’re troubleshooting missing routes, and show ip route doesn’t show them, show ip ospf database helps verify if the LSA has even reached the router.
Each LSA entry also shows:
- The advertising router
- LSA age (in seconds)
- Sequence number (helps track updates)
- Link ID and metric
You can narrow it down further by specifying the type:
# show ip ospf database router
# show ip ospf database network
# show ip ospf database summary
Use this when:
- A route is missing from the routing table
- You want to confirm DR/BDR-generated LSAs
- You’re debugging inter-area or external routes
Pair this with show ip ospf neighbor and show ip ospf interface for a complete picture of your OSPF topology.
What’s Next: Understanding OSPF Areas
So far, we’ve been working with a single-area OSPF design. But OSPF supports multi-area configurations to improve scalability and reduce routing overhead.
There are different types of areas:
- Stub Area – Blocks external LSAs (Type 5) and replaces them with a default route.
- Totally Stubby Area – Blocks external and inter-area LSAs (Type 3 and 5).
- NSSA (Not-So-Stubby Area) – Allows redistribution of external routes as Type 7 LSAs but still behaves like a stub in other ways.
These area types help control LSA flooding and reduce the size of the OSPF database, especially in large networks.
In the next post, I’ll reconfigure this network to use multiple areas and walk you through how multi-area OSPF works.
Leave a Reply