

In this blog series, I will guide you through the steps of creating a campus network using Cisco Packet Tracer. We’ll start with the fundamentals and gradually work our way up to more complex concepts. We’ll explore a comprehensive campus network design, breaking down different sections to explain the basics. As we progress, we’ll seamlessly integrate the entire infrastructure.
IPv4 Decimal and Binary Format
IP addressing forms the foundation of every network design, making a deep understanding crucial for design success. An IP address serves as a unique identifier for devices connected to the internet. The primary types of IP addresses include IPv4 and IPv6.
IPv4 addresses are 32-bit binary numbers, represented in dotted decimal format as four groups of 8-bit numbers. This allows for approximately 4.3 billion unique IP addresses, but this is not enough given the growing number of devices connected to the internet. Before continuing, I’ll recommend you read more about IP addresses in this detailed article
Example:
IP address (decimal format) = 192.168.1.100
IP address (binary format) = 11000000.10101000.00000001.01100100
From the illustration above, we can see what IPv4 addresses look like in binary. That knowledge is crucial in understanding several concepts of subnet masks and IPv4 subnetting.
If we convert the highest decimal value of an IP address octet, “111111”, to decimal, we would get “255”. This means the highest IPv4 number in decimal per octet is 255.
Subnet Mask
A subnet mask is a 32-bit binary number that is used to divide an IP address into the network address and the host address. The network address is the part of the IP address that identifies the subnetwork that the device is on. The host address is the part of the IP address that identifies the individual device on the subnetwork.
Example: a
IP Address = 192.168.1.100
Subnet mask = 255.255.255.0,
Network [192.168.1] Host [.100]
Looking at the example above, the subnet mask 255.255.255.0 means the first three octets are the network and the last octet is the host. Let’s look at other examples
Example: b
IP Address = 10.1.2.3
Subnet Mask = 255.000.000.000
Network [10.] Host [1.2.3]
Example: c
IP Adress = 129.100.200.10
Subnet Mask = 255.255.0.0
Network [129.100.] Host [200.10]
These examples demonstrate how subnet masks help differentiate the network and host parts of an IP address. The examples given illustrate the three primary classes of IPv4 subnetting. For further understanding of classful and classless subnetting, I’ve included recommended readings on subnetting and slash notation, which will be relevant for upcoming lessons.
Network Design Scope
Tasks
These would be our task for the first stage of the series
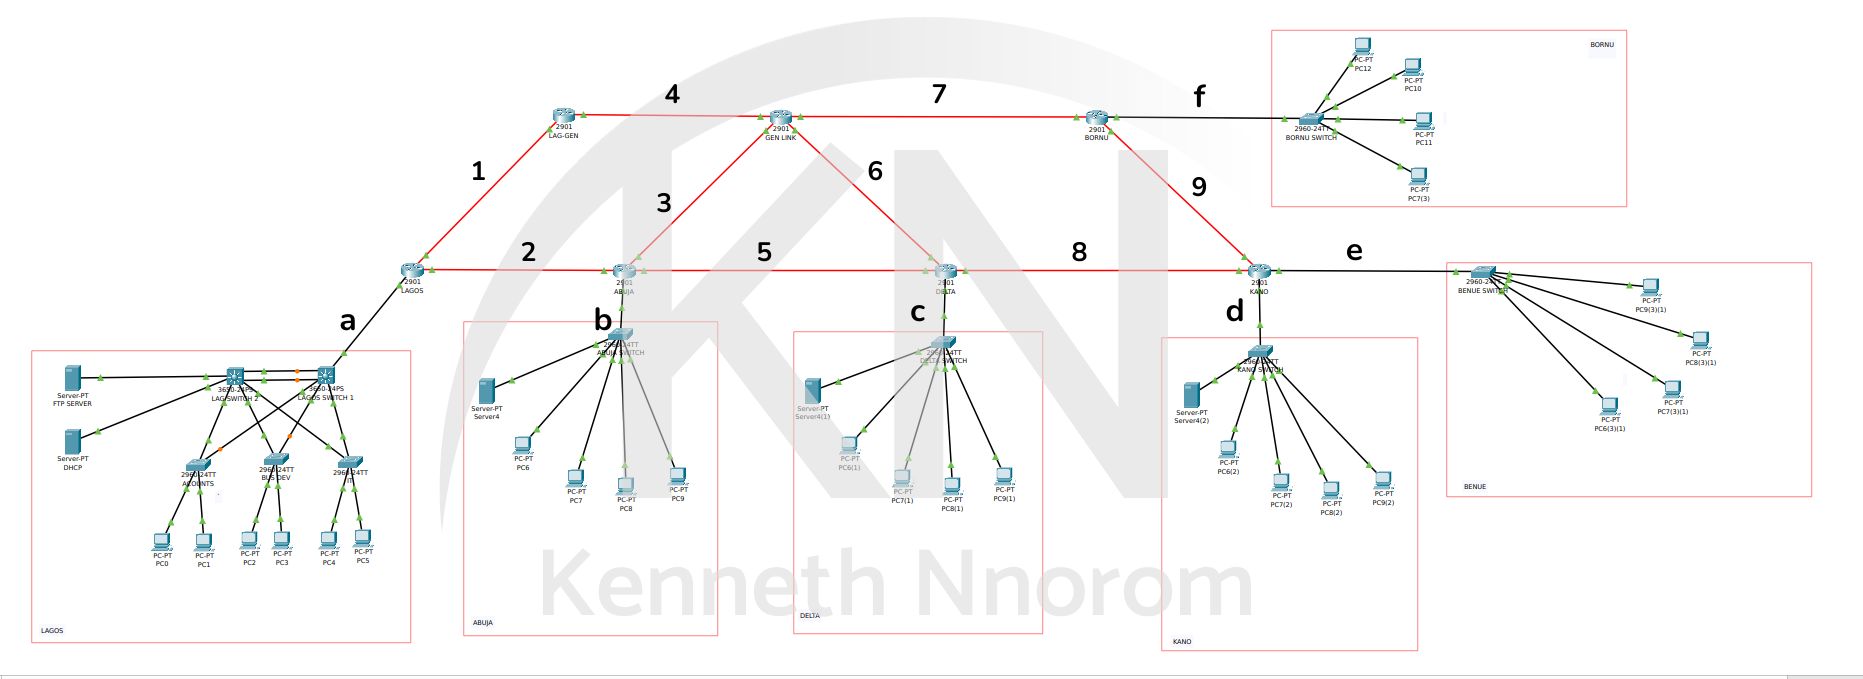
- Given the IP address 20.20.20.0 and subnet mask 255.255.255.0, we need to create 9 subnetworks corresponding to the route links labeled 1 to 9 in the image above.
- We will also subnet the IP address 10.10.10.0 with subnet mask 255.255.255.0 into several networks, each supporting up to 14 hosts, corresponding to the links labeled (a to f) in the image.
- Once we have created the router addresses, we can use the host portion of the IP block to configure the router links.
IPv4 Subnetting 20.20.20.0/24
The following two formulas are used in calculating subnetting where “n” is the number of borrowed bits.
2n = (Number of Network subnets)
2n-2 = (Number of Hosts per subnets)
Let’s follow the above steps to create our networks and host
For network 20.20.20.0/24, we need 9 subnetworks
To make it easier, we express the subnet mask /24 in binary
/24 = 255.255.255.0 = 11111111.11111111.11111111.00000000
The first 3 octets of 1's represent the network, and the last octet of 0's represents the host from where we will borrow bits later in the lesson.
PS: /24 means we have 24 “1’s” in the subnet mask, and converting that binary to decimal gives us 255.255.255.0. Once again, read more about slash notation in the link provided above to understand the concept better.
20 = 1 (Not suitable)
21 = 2 (Not suitable)
22 = 4 (Not suitable)
23 = 8 (Not suitable)
24 = 16 (Suitable)
25 = 32 (Suitable)
26 = 64 (Suitable)
Using the formula 2^n = 9 (where ‘9’ represents the number of subnetworks needed, and ‘n’ represents the number of host bits to be borrowed from the subnet), we can calculate the possibilities by substituting different numbers of borrowed bits into ‘n’ from 0 to 7.
You can choose between borrowing 4 bits or 5 bits, depending on your requirements and number of hosts required. The number of hosts needed hasn’t been specified so we will address the host-related question later. Feel free to select the option that aligns best with these requirements.
Starting with the first suitable number of borrowed bits '4', We can't manipulate the network portion of the subnet but we can borrow 4 bits from the host portion.
20.       20.       20.      0
255.      255.      255.     0
11111111.11111111.11111111.00000000 = 24 (
if we borrow 4 bits from the host portion in red above, the new subnet becomes
11111111.11111111.11111111.11110000 = 28
20.20.20.[  1111 0000 ]
From here we would keep everything constant and only alter the subnet in binary.
| Network | Subnet | Resulting Network Block |
| 20.20.20 | 00000000 | 20.20.20.0 /28 |
| 20.20.20 | 00010000 | 20.20.20.16 /28 |
| 20.20.20 | 00100000 | 20.20.20.32 /28 |
| 20.20.20 | 00110000 | 20.20.20.48 /28 |
| 20.20.20 | 01000000 | 20.20.20.64 /28 |
| 20.20.20 | 01010000 | 20.20.20.80 /28 |
| 20.20.20 | 01100000 | 20.20.20.96 /28 |
| 20.20.20 | 01110000 | 20.20.20.112 /28 |
| 20.20.20 | 11010000 | 20.20.20.208 /28 |
IPv4 Subnetting 10.10.10.0/24
In the previous task, we calculated the number of subnets without considering the number of hosts. This task takes host requirements into account, and we will work through it together.
Although the required number of networks is not explicitly stated, we can see that there are 6 networks labelled (a to f). However, the required number of hosts is explicitly stated as 14. Therefore, we will use the second formula to calculate the number of subnets.
You may be wondering why we subtract 2 in the calculation for hosts per network. This is because the first and last IP addresses in each subnet block are reserved for the network block address and broadcast address, respectively.
For network 10.10.10.0/24, we need 6 subnetworks with 16 hosts
/24 = 255.255.255.0 = 11111111.11111111.11111111.00000000
20 - 2 = -1 (Not suitable)
21 - 2 = 0 (Not suitable)
22 - 2 = 2 (Not suitable)
23 - 2 = 6 (Not suitable)
24 - 2 = 14 (Suitable)
25 - 2 = 30 (Suitable)
26 - 2 = 62 (Suitable)

10.       10.       10.      1
255.      255.      255.     0
11111111.11111111.11111111.00000000 = 24 (
Borrow 4 bits
11111111.11111111.11111111.11110000 = 28
10.10.10.[  1111 0000 ]
| SN | Network | Subnet Host (Binary) | Network Block Address | Useable IP Address | Broadcast |
| 1 | 10.10.10. | 00000000 | 10.10.10.0 | 10.10.10. (1-14) | 10.10.10.15 |
| 2 | 10.10.10. | 00010000 | 10.10.10.16 | 10.10.10. (17-30) | 10.10.10.31 |
| 3 | 10.10.10. | 00100000 | 10.10.10.32 | 10.10.10. (33-46) | 10.10.10.47 |
| 4 | 10.10.10. | 00110000 | 10.10.10.48 | 10.10.10. (49-62) | 10.10.10.63 |
| 5 | 10.10.10. | 01000000 | 10.10.10.64 | 10.10.10. (65-78) | 10.10.10.79 |
| 6 | 10.10.10. | 01010000 | 10.10.10.80 | 10.10.10. (81-94) | 10.10.10.95 |
We calculated the network subnets needed for the 6 labelled networks; we were also the usable host per subnet for all the network subnets as seen in the “Useable IP address” in the table before.
Determine Host Address for Route Links Addresses
Just as we did above with the 10.10.10.0 network to calculate the number of hosts, we will apply the same method to the route links. This is necessary because we require usable IP addresses for configuring the router interfaces. Additionally, this process reinforces our understanding of subnetting concepts.
We have already calculated the block size for 9 route links. For the usable IP, all we need to do is remove the first and last IP of the block for the block address and broadcast addresses.
So let’s start with the first block from Table: A with IP block 20.20.20.0/28.
This IP block has 16 IP addresses from 20.20.20.0 - 15
Network Address: 20.20.20.0 (First address)
Useable Host Address: 20.20.20.[1-14]
Broadcast Address: 20.20.20.15 (Broadcast address)
The next step is to replicate the same for the other 9 addresses and generate the same table similar to that which we did for 10.10.10.0/24 addresses.
In The RealWorld, Work Smart
In real-world scenarios, manual subnet calculation for multiple subnets in large projects can be time-consuming. I personally use Calculator.net for subnetting calculations, but there are many other online tools available.
With experience, you develop an instinctive understanding of the required number of borrowed bits and appropriate subnet masks for specific projects.
For instance, in my implementation of the 20.20.20.0/24 network, I employed a /30 (255.255.255.252) subnet mask, providing four host addresses with only two usable ones. This approach was more practical as I only needed two usable IP addresses per network at a time, enhancing organizational clarity during configuration.
Embark on your subnet mastery by understanding the manual method of IPv4 subnetting, the foundation for tackling any real-world or exam subnetting challenge. Enhance your knowledge by exploring additional resources on IP addresses and IPv4 subnetting.
Conclusion
In the upcoming lesson, we will explore the techniques involved in configuring and implementing the necessary network infrastructure to establish our network in Packet Tracer. We will also learn how to perform preliminary configurations on the devices.
Leave a Reply